Deep Dish Plum Pie on a very windy day

20140922_201334

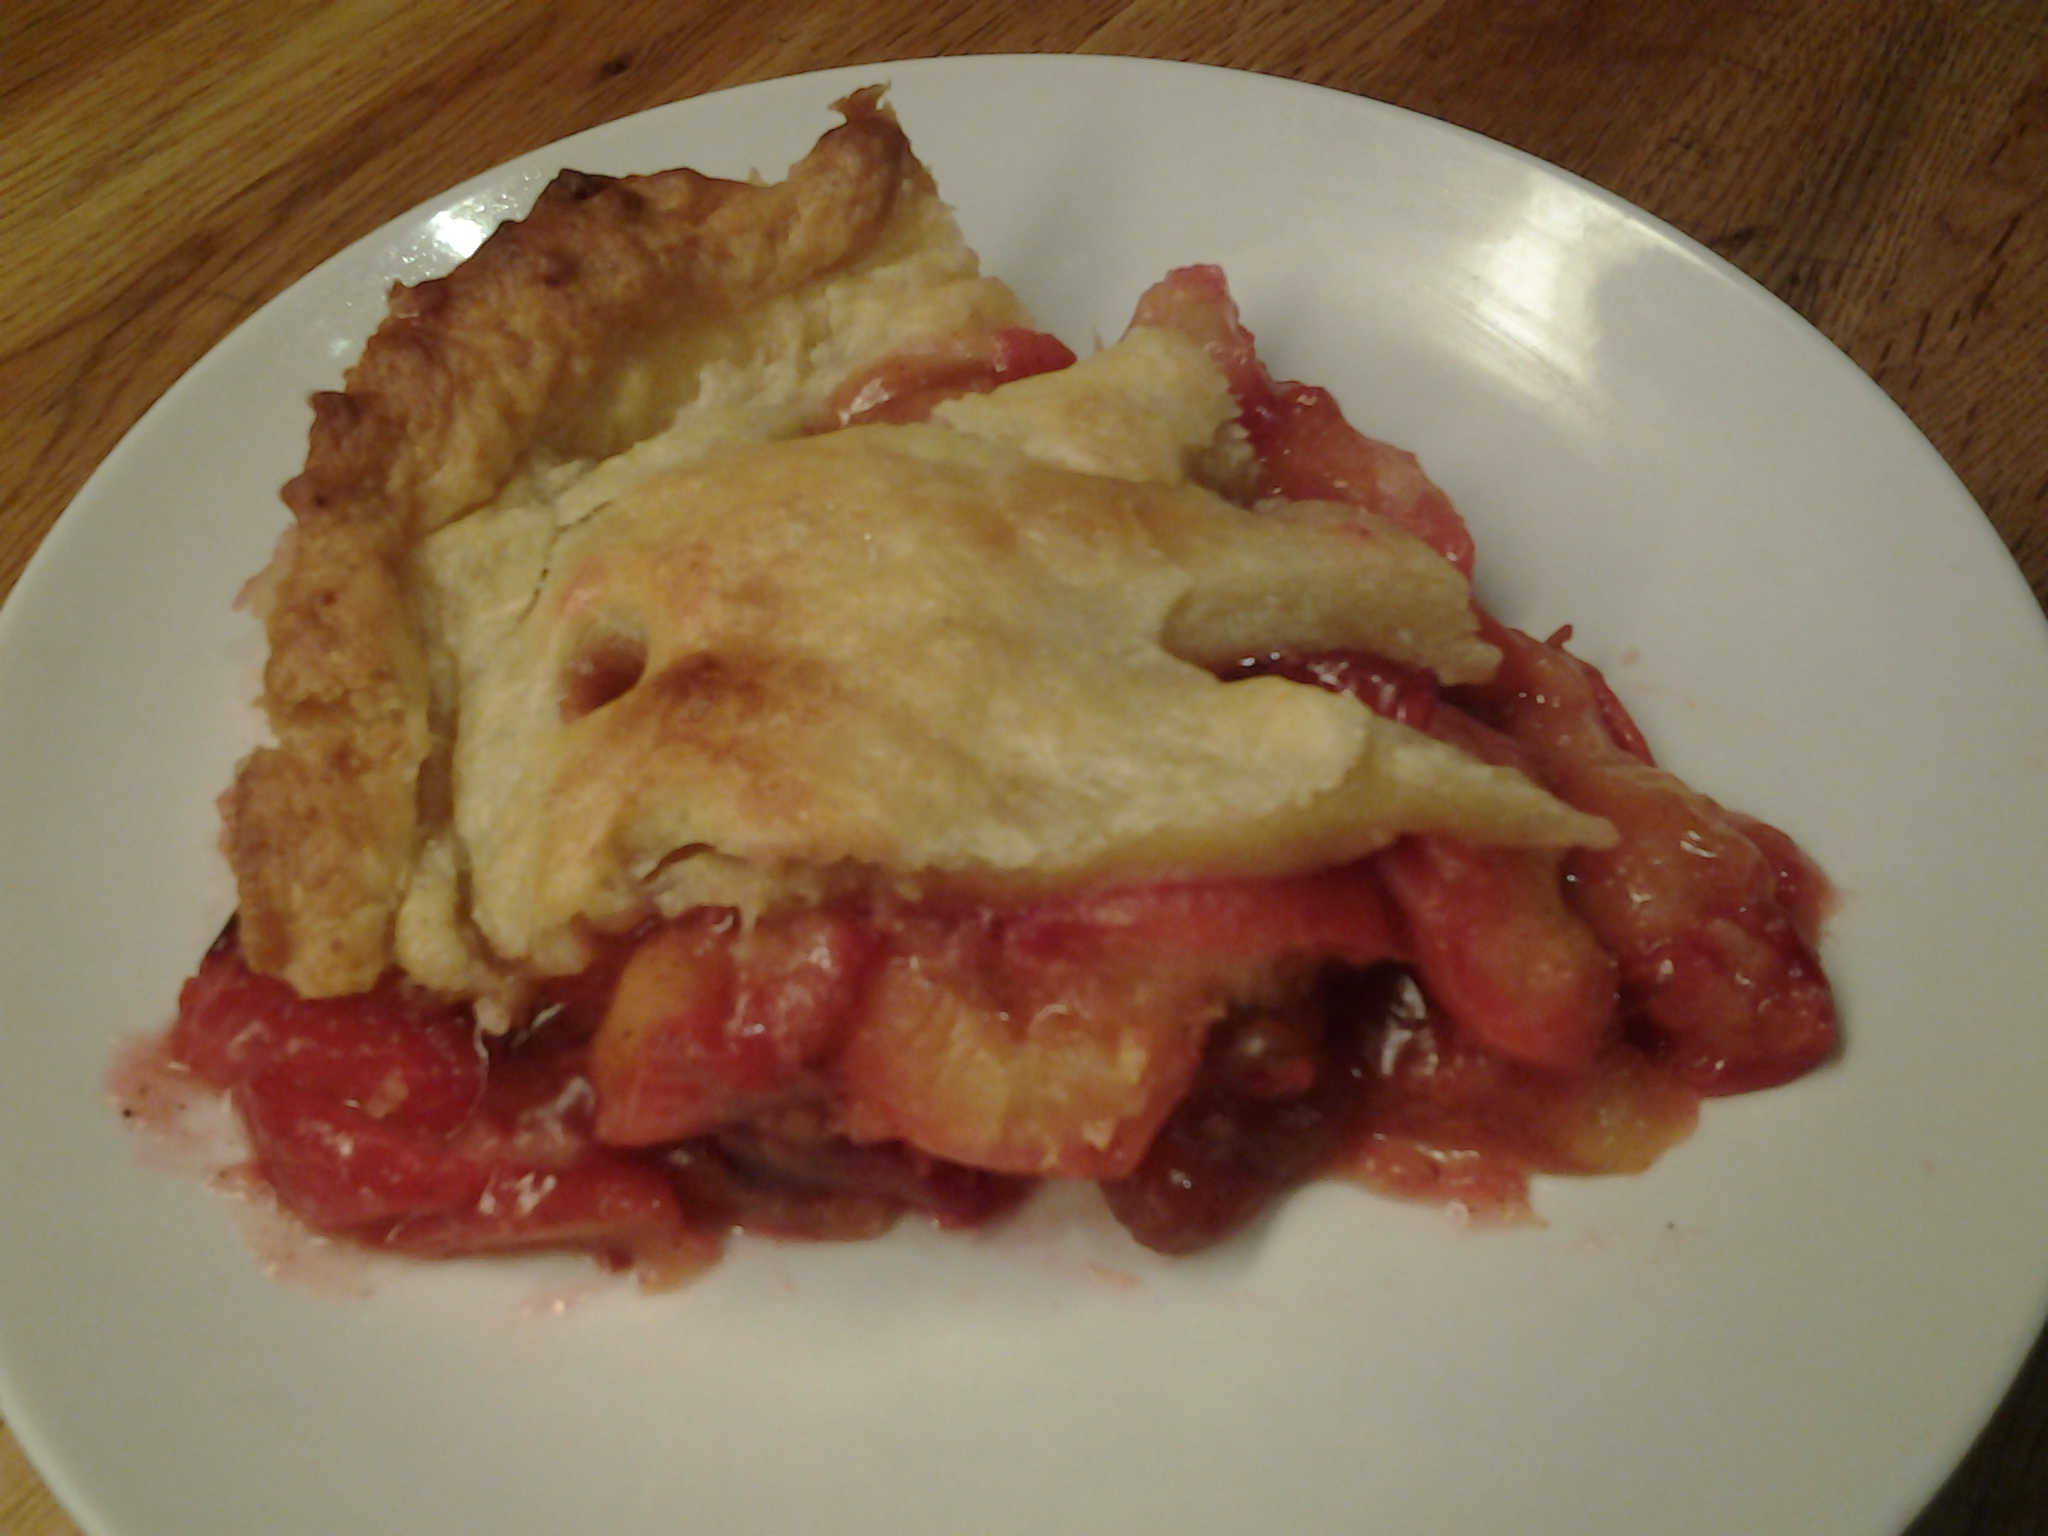
Today summer really turned into fall here in Sweden. Far up north they actually had snow and here where we live it was very windy – even stormy – with grey skies and heavy rainfall. We watched the wind grabbing the trees on our property and we realized we had to get out and save the remaining plums from our tree. The cat kept us company as we collected the plums and when we came back inside we had two large bowls full of red and ripe Victoria plums with us. What to do with them? Some went into the freezer (rinse them, cut them in halves and remove the kernels) for the winter. Some will be turned into jam tomorrow. And some of them we couldn’t resist using for making one of the classic american pies: The Deep Dish Plum Pie.

The pie turned out so delicious that we have to share it with you. It was a real treat this rainy day and it is a great way to use the plums on your tree. Start well in advance since the crust needs some time in the refrigerator. You’ll need:

For the crust and lid:

* 2.5 cups (6 dl) flour (vetemjöl)
* 8 oz. (225 gram) of real butter
* 2 gram (2 kryddmått) salt
* 5-6 tablespoons of cold water

For the filling:

* 1 1/2 Quarts (1.5 liter) of plums, cut in halves and with the kernels removed
* 1/4 cup (drygt en halv deciliter) brown sugar (råsocker)
* 1/2 cup (1 1/4 dl) white sugar
* 3-4 tablespoons of Maizena
* 1 teaspoon of ground cinnamon (malen kanel)
* 1/2 teaspoon of vanilla (vaniljsocker)
* 3-4 tablespoons of Madeira wine.
* 3 tablespoons of real butter

For the pie:
* Real butter (softened) for greasing.
* Some sugar and water to sprinkle on the pie before baking.

Start with making the dough for the crust and lid. Mix flour and salt together in a bowl. Add the butter cut in small dices and use your fingers to mix it with the flour. Add the water and quickly work it in making a smooth dough. Split it in two (one for the crust and one for the lid) and let it rest wrapped in saran wrap (plastfolie) in the refrigerator for a couple of hours.

Put the oven on 435 degrees Fahrenheit (225 degrees Celsius). Grease a deep dish (en djup pajform) with butter. Take out one of the doughs from the refrigerator. Use a rolling pin (kavel) to make a crust and cover the dish with it. Put it back in the refrigerator.

Mix together brown and white sugar, salt, Maizena, cinnamon and vanilla. Add the plums and use your hand and mix it together so that the Maizena spreads evenly over the plums. Add the Madeira wine and stir. Take out the pie dish and pour the filling into the crust. Spread the butter in small pieces over it. Take out the second dough and use a rolling pin to make a lid. Cover the pie with it and pinch together the lid and the crust. Use a knife to cut out decorative holes in the lid – this is not only decorative, it also lets the steam out from the pie when it is baked in oven. Sprinkle some additional sugar and some water over the pie.

Bake in the lower rack of the oven for 20 minutes. Then lower the temperature to 390 degrees Fahrenheit (200 degrees Celsius) and let it bake for another 30 minutes. Cover if it tends to get too dark.

Take it out, let it cool off a bit before serving it as it is or with whipped cream or vanilla ice cream. Yum!

Plum in Madeira: a classic dessert

20140916_161322

Plums were domesticated by humans very early according to hortoculturist Jules Janick who in an article in Plant Breeding Rev. 25 describes how the fruit was first domesticated in Asia. By antiquity plums had been fully domesticated in the west. In our garden we’ve got a Victoria plum tree and we enjoy its fruits every fall.

To make Plum in Madeira has become a family september tradition and when I did some research on the Internet I discovered that this is a popular dessert in both Sweden and America. I didn’t find much about the origins of Plum in Madeira, but one website claims the origins are danish. The classic danish chocolate brand Anton Bergh has a chocolate covered marzipan bar with Plum in Madeira so maybe that is true.

Plum in Madeira are really easy to make but it takes a couple of days for them to become ready to eat. I usually make a few batches and store some in plastic jars in the freezer so that I can serve them during the winter. They taste excellent served warm with cold whipped cream or vanilla ice cream. You’ll need:

• 1 1/4 lbs (cirka 1 kilo) plums
• 24.5 oz. (700 gram) sugar
• a little less than a cup (2 dl) water
• a little less than a cup (2 dl) sweet Madeira wine
• 1 vanilla bean (vaniljstång)
• 1 gram (1 krm) benzoate (bensoat) for preserving if desired.

Rinse the plums. Split them longside and remove the kernels. Put the plums in sterilized jars. Put sugar and water in a pot and bring to boil. Skim off the white foam from the surface. Split the vanilla bean lengthwise and scrape the seeds. Add Madeira wine and the vanilla seeds to the syrup you made of water and sugar. Dissolve the benzoate in a couple of spoonfuls of the syrup and then add it. Pour over the plums. Put lids on. Keep in the refrigerator and stir occasionaly. After three days they are ready to be enjoyed.

A farmer’s daughter’s Apple Cake

20140915_145024

My mom grew up as a farmer’s daughter in a beautiful small village in the north of Sweden. Since my grandparents had eight children and a farm with cows and sheep to take care of my mother and her siblings did not have the opportunity to get higher education but from young age they on the other hand learned a lot of skills that they later told and taught us kids. Every summer in the 1950’s she would accompany her aunties as they walked with the cows from the farm to the summer farm up in the mountains where the cows would roam free in the forest during the day eating grass, mushrooms and other nutritious things. The aunties milked the cows every morning and made butter, cheese and sometimes a pudding made with saffron out of the fresh milk. These summer farms were common in northern Sweden but after the decline in small farming after the 1960’s more and more of them were put out of use. Just a handfull of working summer farms still exists today, many of them open for visitors that can learn about old low tech farming methods and buy the freshly made products made of the morning’s milk.

Of course my mom also were taught how to cook and to take care of the yearly harvest of apples, potatoes and berries. Nothing would go to waste. When she had lots of apples she would make several batches of this very easy and tasty apple cake, cut it in pieces and store them in the freezer so that we’d have apple cake for our swedish fika (coffe with something sweet like apple cake or cinnamon rolls served with it) during the winter. My mom passed away a couple of years ago (it is her as a school girl in the 1950’s in the picture) but I still find notes with her hand written recipes in my cookbooks and I wanted to share her recipe for Apple Cake with you. Note: if you make this in the U.S. it might take some trial and error since flour works differently in different countries and this recipe is based on swedish wheat flour. With that said this is a wonderful way to take care of your apples for winter. To make the farmer’s daughter’s Apple Cake you’ll need:

• 3 eggs
• Approx. 2 cups (4,5 dl) of flour
• 2 cups (4,5 dl) of sugar
• 3 teaspoons of baking powder
• 3 tablespoons of softened real butter
• A little less than a cup (2 dl) of water
• 5-6 apples
• Sugar and ground cinnamon to sprinkle over the cake
• Real butter and breadcrumbs for the cake pan

Rinse and core the apples. Don’t peel them. Cut the apples into wedges and set aside.

Put the butter and the water in a pot and bring to boil. Let it cool off. Beat eggs and sugar until fluffy with an electric mixer. In another bowl, mix together flour and baking powder. Add the flour mix and the water/butter to the egg mix and stir it together carefully with a large spoon so that you get a smooth batter. Grease and bread a large rectangular cake pan. Pour the batter into the pan. Put the apple wedges in a layer over the batter and push them down a bit into the batter. Sprinkle the cake with some sugar and ground cinnamon. Bake in 390° Fahrenheit / 200° Celsius for about 20 minutes. Let it cool off a bit and then cut the cake into serving size squares. Eat luke warm or cold. You can also serve them with whipped cream or vanilla ice cream. Leftover cake can be stored in freezer. I hope you’ll enjoy my mom’s recipe!

Peanutbutter church spread – indulge yourself amish style

20140912_114213

Spending time in Ohio challenged my swedish prejudices of so many things so many times. For example I thought amish cooking would be a bit ascetic but that was before I encountered Amish Peanutbutter Spread. This is a smooth indulgence combining sweet marshmallow creme with smooth peanutbutter in a way I never came across in Sweden and both kids and grown ups love it. This spread is also called Church Spread since the Ohio amish brings it to the church gatherings that are so important to the social culture of their community.

This spread is perfect for your family weekend gathering: you can dip fruit like pieces of bananas or your garden apples in it, pour it over ice cream or use it for sandwiches. Our own family serendipity invention was dipping popcorn in it. Oh, how I love the combination of the salt on the popcorn with the peanutbuttery sweetness of the Amish Church Spread.

Marshmallow creme/marshmallow fluff, corn syrup and high quality natural peanutbutter can be bought in regular supermarkets in Sweden nowadays. Make sure the peanutbutter is natural and creamy. In Ohio we love Smucker’s and in Sweden Green Choice is our recommended brand. It’s sticky but easy to make. You’ll need:

• 1 cup (lite drygt 2 1/4 dl) corn syrup
• 1/2 cup (drygt en deciliter) creamy natural peanutbutter
• 1/2 cup (drygt en deciliter) Marshmallow Fluff
• approx. 1/4 cup (cirka 1/2 dl) water
• 1 tablespoon brewed coffee

Put all the ingredients in a bowl. Mix with electric mixer until you get a smooth spread (add half of the water first, and then a little at a time until you get the smooth texture you want) Keep in airtight container. Serve with pieces of fruit or popcorn, on a sandwich or poured over ice cream. Happy Friday!

How hot do you like your Hot Pepper Jelly?

20140910_195738

The inspiration for today’s kitchen experiment came from my morning visit to Nelins Food Market – a store specialized in vegetables. My eye was caught by some baskets filled with the most beautiful, shiny and colorful peppers: jalapeño, red peppers and green peppers. I just couldn’t resist them so I bought a bunch of each and decided to finally try to make my own hot pepper jelly: a delicacy I loved from the first spoonful when I tasted it in the U.S. I have never seen a jar of hot pepper jelly in a store in Sweden, but I always bring some home from America and my mother-in-law has also sent me jars.

The origin of the Hot Pepper Jelly is texan. The first jars were made and sold in Lake Jackson, Texas, in the 1970’s and today you can find hot pepper jelly all across the United States. The classic way of serving it is together with Philadelphia Cream Cheese and crackers like we do in the picture above (note the Texas beer bottle holding Armadillo that two lovely ladies from Texas sent us – the iconic Lone Star bottle included). It also tastes wonderful with brie cheese, as a condiment for fish and burgers or melted and poured over your meat. You can also make your peanut butter and jelly sandwich a bit more grown up and spicy by using the hot pepper jelly. It is great for parties and buffets.

There are so many versions of the hot pepper jelly and every cook can experiment until she or he finds the unique family signature for their recipe. The original recipe is made from jalapeño peppers only but I wanted to start with making a somewhat milder hot pepper jelly using all three kinds of pepper fruit I bought. It turned out very mild but flavorful (probably too mild for most americans but perfect for swedes to start with). So let my recipe be an inspiration for your own hot pepper jelly. Add more jalapeño peppers for more heat. Be careful when you handle the pepperfruits. I wear latex gloves so that I protect my hands from the fruits so that the pepper doesn’t accidently end up in my eyes afterwards.

The secret of making jelly is to find the right mix of pectin, sugar and acid and since pepper fruits are very low in pectin you’ll have to add it. Different brands and texture (powder or fluid) of pectin works differently. For some you’ll have to add lemon juice for the best jelly result, so read the instructions of your brand of pectin carefully before you start. It can be a bit of trial and error. My first batch ended up runny (but still tasty) but when I made the second batch I used more pectin, added some lemon and it came out perfect. With that said, making hot pepper jelly is easy and not at all time consuming. Here’s my recipe. You’ll need:

• 1 large red bell pepper (röd paprika)

• 2 jalapeño peppers

• 1 red italian pepper (spansk peppar)

• 1 green pepper

• 6 cups (14 dl) of sugar

• 1.5 cups (3,5 dl) of apple cider vinegar

• pectin according to instructions on package (plus freshly pressed lemon juice if needed according to the instructions on pectin)

Rinse peppers, split them longside and remove all seeds and membranes. Use a food processor to chop finely. Put the chopped peppers in a large pot (not aluminum) and add sugar and apple cider vinegar. Bring to boil and let it boil for about a minute (stir occasionaly during the heating up and boiling so it doesn’t burn). Remove from heat. Add pectin according to instructions. You might have to add lemon and/or bring to boil again. Skim off all the foam from the surface and discard. Pour in clean sterilized jars, put lids on and can according to usual canning procedures if you need to do that. Opened jar should be stored in refrigerator. Have a nice texan party!

About missing an apple tree and a really easy recipe for Swedish Apple Sauce

20140902_143740

“And the Astrakhan apple tree at the gable blossomed for the fourth time. For three consecutive springs, the blooms on the tree had frozen. This year they remained their full time, this year the apple tree would bear fruit for the first time.
A sapling had grown up from seeds that had come from Kristina’s parental home, Duvemåla in Sweden, and now the sapling had grown into a tree. Kristina had worried lest the young roots freeze and die in the cold Minnesota winters. During the cold season the naked, icy branches poked up through the snowdrift against the wall as if reaching for help. But each year anew the large, rough, hairy leaves decked it in green.
And now Kristina’s tree had reached its fruiting age”

These words were written by swedish 20th century author Vilhelm Moberg in the novel The Last Letter Home. This novel is the fourth and last book in the Emigrants series, the epic story about the swedish emigrants Karl-Oskar and Kristina and their struggle for building a new life as settlers in Chisago county, Minnesota, in the mid 19th century. The Emigrants series are the books that Moberg is still today most known for in both Sweden and America and it took him ten years to complete the suite of books (The Emigrants 1951, Unto a Good Land 1954, The Settlers 1961 and The Last Letter Home 1961).

Kristina emigrates to the United States together with her husband Karl-Oskar, but unlike Karl-Oskar Kristina misses Sweden terribly and has problems adjusting to the new country. She also misses the apple tree she had in Sweden and brings seeds to plant one in America. Not until the last book it bears fruit. The story of the tree is also an allegory for the emigrant experience and Moberg’s books are very universal in the way this experience is described. Therefore these books are still loved and read even today by swedes, americans and also by immigrants to Sweden.

One thing swedish and american food culture shares is the love for apples. I want to share with you a very easy-to-make recipe for Swedish Apple Sauce. This apple sauce is much less sweet than most american recipes, but if you want to cut down on your sugar consumption that’s a good thing. I used Transparent Blanche from my garden, but any tart kind of apples will do.

You’ll need:
• Apples
• Sugar, amount according to instructions in the recipe
• Ascorbic acid (askorbinsyra) according to instructions on package
• water

Rinse and cut the apples in cloves without peeling them. Pour just enough water to cover the bottom of a large pot. Put the apples in the pot. Bring to boil and then lower the heat and let the apples simmer with lid on until they are soft and mushy. Then remove from heat and make a smooth puree using an apple masher and strainer (använd äppelvagga för att göra en slät purė). Weigh the puree. Add a little more than half a cup (1,5 dl) of sugar and ascorbic acid according to instructions on package (2 kryddmått) per every 2 pounds (per varje 1 kilo) of puree and stir. Keep the apple sauce in the freezer in plastic containers. You can store the apple sauce this way up to a year. Enjoy on pancakes, with oat meal, as filling in cakes, with ham or meatballs or as a side.

Yes! Juice made from Rowan-berries tastes great!

20140826_195531

Outside of our house there’s a Rowan-tree whose beautiful red-orange berries each year tells us that summer is transcending into fall. Today’s kitchen experiment was making juice for a non-alcoholic rowan-berry drink from an old hand written recipe on a note I found in my grandmother’s kitchen files. Her generation tried to use as much as possible of what could be picked out in nature for free and making juice and jam from rowan-berries was common in Sweden. I very rarely see it on menus or in peoples pantries today but I took interest in traditional cooking and in a lifestyle where you take care of as much of nature’s gifts as you can instead of buying stuff so of course I wanted to try the rowan-berry recipe when I have an abundance of these berries right outside of my house.

“Too tart, the fox said about the rowan-berries” is a swedish saying you use when someone puts down something or someone he or she can’t get. In a way the fox was right. Rowan-berries are both tart and bitter – especially the wild growing ones while the berries from cultivated rowan-trees are somewhat sweeter. Taken straight from the tree they are more or less unedible, but if you cook them they are pretty pleasant tasting and have also been used in traditional medicine.

The rowan-trees actually belongs to the rose family and grow wild in most of Europe. They were introduced as ornamental trees in North America where they are also known as Mountain Ash-trees and today they are naturalized and grow wild from Washington to Alaska.

The Rowan-trees also have their place in mythology and litterature. For example in the Icelandic Snorri’s Edda from the 13th century Snorri Sturlason tells the story about how Thor, the god of thunder (yes, there was a god of thunder before Gene Simmons), saves himself from drowning in a river created by the angered giantess Gjálp by holding on to the branch of a rowan-tree. But now I’ll cut to the chase: the recipe for the drink made from rowan-berry juice. You’ll need:

• 2 lbs. 3 oz (1 kg) of cleaned, rinsed rowan-berries.
• 2 lbs. 3 oz (1 kg) tart apples
• 0.33 gallons (1,25 liter) of water
• white sugar according to instructions (see below)
• benzoate according to instructions on benzoate package

First, put the rinsed rowan-berries in the freezer for an hour. This is because the berries has a somewhat bitter taste that becomes more pleasant if you do this first for a better result.

Then put the rowan-berries and the apples, cut into pieces, in a large pot. Add the water, bring to boil and let it simmer until the berries and apples are soft and mushy. Remove from heat and pour into a fine mesh strainer lined with cheesecloth (saftsil) and let it self-strain into a large, clean bowl for 30 minutes.

Measure the juice before pouring it back in the pot. Bring to boil. Remove from heat and add 2 rounded cups (5 dl) of sugar for every 0.25 gallons (1 liter) of juice. Stir and bring to boil again. Remove from heat and remove all of the white foam on the surface. Add benzoat for preserving according to instructions on benzoate package (i Sverige: ett rågat krm bensoat för varje liter saft). Pour in clean bottles.

For serving: pour juice in a glass, then add water according to taste and serve chilled. This drink is a perfect non-alcoholic beverage for grown-ups. Tart, sweet, a little bitter and almost spicy at the same time. Skål!

The Lingonberry King and my family recipe for lingonberry jam

20140823_131306

Lingonberry jam was staple food in my family when I grew up and since my son seems to have inherited my taste for lingonberries it still is and we spend a couple of days each fall picking lingonberries in the forests of the north. When I was younger lingonberry picking also was a good extra income and together with my friends I roamed the forests for “the red gold” and then brought it to the lingonberry brokers (yes, such brokers do exist!). Sometimes virtual car chases followed after hiding behind the gas station in the remote village of Kårböle since no one wanted to reveal THEIR spot of abundant lingonberries in the forest.

Years later I read a fantastic novel “based on a true story” by swedish author Jan Henrik Swahn: Lingonkungen (The Lingonberry King). The novel tells us a story resembling all the classic self-made-man-pulls-himself-up-by-the-bootstraps-and-makes-a-fortune-stories of America. Oscar Johansson, later known as The Lingonberry King, was born in 1881 in Dalarna, a forest province in the southern north of Sweden. He was the son of an one-armed (!) blacksmith and the family was very poor. Oscar proved to be a financial genius from early childhood and when his peers sought a way out of their poverty stricken life in the north by moving to Stockholm or emigrating to America to seek their fortune Oscar found ways to survive and make a living in the place where he grew up. Together with his father he opened a store that put the competitors out of business but his real streak of luck came when he and his brother came up with the first ridiculed idea of exporting the red gold of the forest – the lingonberries – to Germany. Hereby he built his fortune forever leaving poverty behind. This is a both entertaining and interesting novel that also tells us about the history of Sweden through the story of an extraordinary and creative entrepeneur. Is it a true story? I did some research on the Internet but found few traces of the real Oscar Johansson, born in 1881. I did find a post in the online catalogue of the National Library of Sweden. Oscar Johansson, born in 1881, has written a book with the title “Lingon” (Lingonberries)….

Lingonberries and lingonberry jam have gained popularity in the U.S. in recent years, maybe because of stores and restaurant chains like IKEA and IHOP or thanks to TV-personalities as Oprah’s Dr. Oz who gave attention to the health benefits of eating lingonberries. Lingonberry jam can be bought in many stores in America and these brands of ready made jam are OK, but they can, in my opinion, never compete with the flavor of real home made lingonberry jam made from fresh berries. Fresh frozen lingonberries can, in the U.S., be bought online from retailers as Northwest Wild Foods or Amazon or from online scandinavian stores as scandinavianbutik.com. Here’s my family recipe, handed down from my grandmother to my mom to me and then it will be handed down to my lingonberry jam lover of a son. It’s easy to make! Note that the jam made by this recipe makes a much looser, somewhat runny, and much less sweet jam than the ones you buy in a store but this, in my opinion, brings out the unique taste of these berries even better. You’ll need:

• 0.5 gallons (2 liter) of fresh, frozen lingonberries straight from the freezer
• 2 1/2 cups (6 dl) of sugar
• 1 1/4 cups (3 dl) of water

Put everything in a large pot, bring to boil, lower the temperature and let it simmer for 15 minutes, stirring occasionaly with no lid on the pot. Remove from heat and remove the white foam on top of the jam. Pour into clean jars and keep in refrigerator. Enjoy the jam with your pancakes, in your breakfast oatmeal or with your swedish meatballs.

Amish Apple Butter – slow food for all your senses

20140818_225426

The first time I visited Ohio one of the things that made the greatest impression on me was meeting the Ohio Amish in every day life – large families shopping at the grocery store, men with beards and straw hats bypassing our car with horse and buggy and the young woman wearing a bonnet, traditional long sleeved dress and modern running shoes on her bike on the side of the road. Meeting them was a clear illustration of the diversity of the United States – the Amish in their 18th century clothes and their simple and radical way of life coexisting with the modern society of the midwest with cars, computers and mass consumerism. The amish came to the United States from Europe in the 18th century after facing religious persecution in the old world. They brought with them their faith and language and many of them still today speak Pennsylvania Dutch in worship and everyday life. They kept to their old traditions, lifestyle and clothing and today there are still a little more than 280.000 of them living in communities mainly found in Pennsylvania, Ohio, Indiana and in parts of Canada. Many of the amish still farm the land with traditional methods not using electricity or engines. They are also excellent craftsmen and -women known for making beautiful wooden furniture and quilts among other things. My partner worked in construction with amish carpenters and they were known for their skills and high work ethic. Some amish run their own small business like horse auctions, flee markets, restaurants and food production. The latter of course caught my interest and I wanted to find out more about the amish food culture.

My first encounter with amish cooking was when we visited Shrocks Amish Farm and Village in Berlin, Ohio. We went for the Amish Home Tour and our guide was a very nice lady that grew up amish but now belonged to a more liberal mennonite church. She showed us the farm house and what struck me was how familiar especially the kitchen was for me who grew up in a family with farmer’s background in rural northern Sweden. In the amish household they still use the same tools and utensils that my grandma used back in the old days when everything was still made by hand from grinding the coffee beans to washing clothes and ironing. I learned that the Amish have a long and proud culinary tradition with old school cooking, baking and preserving not letting anything of what they produce at their farms go to waste. In the kitchen we met young girls in bonnets and dresses making apple butter. I bought a jar and it tasted heavenly made with natural ingredients only. Together with Ruth, my amish doll that you can see in the picture above, who always keeps me company in my kitchen I’ll guide you through the steps of making your own amish apple butter. Remember this takes time to make – it needs a couple of hours to cook to the right creamy texture that gave this delicacy the name “butter” eventhough there is no butter in it. This is old school slow food and making and eating it will give you something for all your senses. The wonderful smell that fills your kitchen when making it, the beauty of the color as it deepens while cooking and of course the taste and texture when enjoyed spread on your favorite bread. You’ll need:

A large pot
A chinois sieve (en äppelvagga är perfekt att använda)
Sterilized jars with lids

• 4 lbs (knappt två kilo) apples in quarters. Do not peel or core them since we want the pectin from the peels and kernels!
• 1 cup (något mindre än 2,5 dl) of apple cider vinegar
• 2 cups (lite mer än 4,5 dl) of water
• Sugar (amount according to instructions down below)
• 2 teaspoons of ground cinnamon (I used high quality Saigon cinnamon with a wonderful result, but any kind of cinnamon will do)
• 1/2 teaspoon of ground cloves (kryddnejlika, malen)
• 1/2 teaspoon of ground all spice (kryddpeppar, malen)
• a pinch or two of salt
• The zest and fresh juice of a lemon

Put the apples, water and apple cider vinegar in a large pot, cover with a lid and bring to boil. Let it simmer (sjuda) under the lid until the apples are soft, approx. 20 minutes. Remove from heat and ladle the apples through the chinois (använd äppelvagga) to make a puree without seeds or peels in a bowl. Measure the puree when putting it back in the pot. Add 1/2 cup (en dryg deciliter) of sugar for each cup (för varje knappa 2,5 dl) of apple puree and stir. Add the spices and the lemon juice + zest.

Now cook the puree in the pot without lid on medium low heat. Be careful so it doesn’t get burned! Stir often from the bottom of the pot. After approx. 2 hours the color has deepened and the texture will be thick and smooth. Do the freezer test: put a spoonful of apple butter on a plate in the freezer for a couple of minutes. It should be soft but not runny when you take it out. Pour in sterlilized jars and put on the lid. Keep in refrigerator.

When life gives you lemons, make elderflower lemonade

Image

We are lucky to have an Elderflower tree (Sambucus Nigra) on our property and it gives us an abundance of white flowers with a wonderful scent each summer. One of the things I do to bring some of the feeling of the short, lovely swedish summers with me during the dark and sometimes harsh winters is to make a big batch of Elderflower lemonade and keep it in the freezer. This is not a recipe for lemonade the american way but for what we in Sweden called “saft” which is a thing my partner from the U.S. never heard of before coming to Sweden. In the english speaking world it is referred to as squash or sometimes cordial and means a fruit flavoured non alcoholic concentrated suryp that you mix with water to drink. My Elderflower lemonade or elderflower squash is really easy to make. Elderflowers can be picked from trees in central and southern Sweden (as I grew up in the northern parts where these trees don’t usually thrive and grow I was unfamiliar with the taste of squash made with these flowers until I moved to central Sweden to go to college) and in large parts of the U.S. – from the east coast, all the way to the Great Lakes and beyond and in some parts of the pacific north and south west. In this recipe I use fresh, newly picked elder flowers but there are also recipes that are based on dried elder flowers that can be bought in some stores and farmer’s markets both in Sweden and in the U.S. You’ll need:

  • 40 freshly picked, rinsed elder flowers (the whole cluster of flowers on a stalk counts as one)
  • 5 organic lemons (use organic since you won’t peel them and it is better without the chemicals used for non organic)
  • 1.3 gallons (5 liter) of white sugar
  • 6 sticks of whole cinnamon (kanelstänger)
  • 2 organic vanilla beans (vaniljstänger)
  • 4 oz (120 gram) powdered citric acid, “sour salt” (citronsyra) – optional!
  • 0.8 gallons (3 liter) of boiling water

I usually use a clean plastic bucket with lid (should be the size of at least 2.6 gallons or 10 liter) for this purpose. Rinse the elderflowers and set a side. Rinse the lemons and slice them into thin slices and set aside. Break the cinnamon sticks in smaller pieces and cut the vanilla beans lengthwise and then in smaller pieces. Mix the sugar with the powdered citric acid/sour salt (citronsyran). Put half of the flowers in the bucket. Cover with half of the lemons, vanilla beans and cinnamon sticks and then cover with half of the sugar. Repeat the procedure with the rest of the flowers, lemons, cinnamon sticks, vanilla beans and sugar. Then pour the boiling water over the layers in the bucket. Close the lid and keep in a cool place. Stir after a couple of hours, then stir again once a day for 8-10 days. After 8-10 days, strain the liquid (sila saften) through a filter or sieve and use a funnel (tratt) to pour it into bottles. Use clean dry plastic bottles if you want to keep it in the freezer. Otherwise clean dry glass bottles are fine. For serving, mix with as much water (approx. 1:8 should be just enough) as needed for a pleasant taste. Served chilled or with ice.

As American as Apple Pie

Image

My auntie Karin who lives up north in Sweden came to visit us this past weekend and we wanted to make something typically american to treat her with so we decided to make a classic american apple pie with both crust and lid (swedish apple pies normally don’t have lids).

There’s an american saying – as american as apple pie – meaning that something or someone is typically american. Of course apple pie is not an american invention but it is nevertheless a very common and loved dessert in america where many families take a lot of pride in their home made pies often made from recipes passed down through generations. The apple in itself is not of american origin but were introduced to the continent by european settlers and colonists. They used apples for a lot of things – especially for cider which was a breakfast staple among the colonists. The apple and the apple pie later became an often used symbol in american culture.

As Ohioans we particulary associate apples with a character well know in all of America – Johnny Appleseed. His real name was John Chapman (1774-1845) and was born in Massachusetts but spent a large part in Ohio where his father had a farm. He was a pioneer nurseryman (plantskoleman) and according to the legend he wandered across large parts of America ranfomly spreading apple seeds from his pocket and thereby spread the fruit tree all over the midwest. He did, through careful cultivation rather than a random spreading of seeds from a pocket, indeed introduce apple trees in the states of Ohio, Pennsylvania, Illinois, Indiana and parts of West Virginia during his extensive travels in these states. 

Johnny Appleseed never married. He had a positive view on native americans and that positive view was mutual since the native americans considered him a person touched by The Great Spirit. He also revered animals, saved horses from slaughter and became a vegetarian. Johnny Appleseed had a remote swedish connection – he was a missionary for The New Church or Swedenborgian church that was founded on the teachings and revelations of the swede Emmanuel Swedenborg in the 18th century. Johnny Appleseed wrote a travelling hymn that is still today sung before meals in some american families: “Oh, the Lord is good to me, And so I thank the Lord for giving me the things I need, the sun and the rain and the appleseed….”

So now you see why the apple pie was the dessert of our choice for my aunt’s visit. We’ll give you the recipe we used. Serve it luke warm with vanilla ice cream or in the real american way with cheddar cheese on the side since cheddar and apples are an excellent combination! We got our recipe from a cookbook: Amerikas bästa pajer (America’s best Pies) written by the swede Agneta Weiland and the american Jane Whitman Tierny, published in Sweden by ICA Bokförlag. You’ll need:

For the crust and lid:

  • 2.5 cups (6 dl) all purpose flour (vetemjöl)
  • 1/5 teaspoon (1 kryddmått) salt
  • 8 oz (225 gram) real butter
  • 2 tablespoons of cold freshly pressed lemon juice
  • 4-6 tablespoons of very cold water

For the filling:

  • 8 big apples, for example Granny Smith, peeled and sliced in thin wedges (klyftor)
  • 1/2 cup (1 rågad dl) sugar
  • 3 tablespoons of Brown sugar (farinsocker)
  • 2.5 tablespoons of all purpose flour (vetemjöl)
  • 1 teaspoon of ground cinnamon
  • 1/5 teaspoon (1 kryddmått) of freshly grated nutmeg (nyriven muskotnöt)
  • A pinch of salt
  • 2 tablespoons of freshly pressed lemon juice
  • The cest of a lemon
  • 2 tablespoons of butter

For brushing (pensling):

  • 2 tablespoons of heavy cream (vispgrädde)
  • 1 tablespoon of sugar

Start with making the crust/lid. Mix together the cold butter, flour and salt. Add the lemon juice and then just enough water so that you can make a ball by squeezing the dough gently. Make two balls of it (one for the crust and one for the lid). Make two flat pancakes of the balls,  wrap them in Saran Wrap (plastfolie) and let them rest in the refrigerator for a couple of hours.

Put the oven on 440 degrees Fahrenheit (225 grader Celsius). Roll out the dough (kavla ut degen) to a lid and a crust. Dress a pie mold with the crust and let the crust and lid rest in the refrigerator while you make the filling.

Stir all the ingredients of the filling together, except the butter. Put the filling in the crust. Put the butter in small bits over the filling (klicka smöret över fyllningen). Brush (pensla) the edge of the crust with water and cover it with the lid and gently squeeze the lid together with the edge of the crust. Cut a few (decorative) holes in the lid for the steam to come out. Brush (pensla) the pie with the heavy cream (Vispgrädde) and sugar.

Bake it in the middle of the oven for 15 minutes on 440 degrees Fahrenheit (225 degrees Celsius). Then lower the temperature to just under 400 degrees Fahrenheit (200 degrees Celsius) and bake for an additional 45 minutes (cover with baking paper if it gets to dark). The apples should be soft and the pie golden brown when ready. Let it cool of and serve with your choice of vanilla ice cream or cheddar cheese. Delicious! My auntie loved it too. 


Don’t you put rhubarb on my rhubarb jam! An idiomatic expression and an awesome jam recipe

Image

“You don’t master a language until you master its idiomatic expressions” my high school English teacher once said to me and then she handed me a book of english idioms and idiomatic expressions. She was right. If you don’t master the idiomatic expressions of a language every day conversations can become very confusing. Once you master your english idioms you realize that people actually want good things to happen to you in stead of bad things when they tell you to “break a leg”. The same goes for mastering swedish. If a swede tells you that a guy put rhubarb on your book (han lade rabarber på din bok) the swede is not saying that a man went to your desk with a bunch of rhubarb stalks and spread them over your copy of James Joyce’s Ulysses. The swedes says that the man snitched your book. That is what the idiomatic expression to put rhubarb on something (lägga rabarber på något) means.

Rhubarb is very popular in Sweden and many swedes grow it at home in their gardens. It is a personal summer favorite of mine and I make pies, jam (marmelad) and swedish saft every year and put it in the freezer to be able to enjoy my rhubarb even during the long, dark winters. This is the recipe for a rhubarb and ginger jam (marmelad) that I love to make. The recipe comes from a preserving handbook my mom gave to me in the late 80’s. I started the preparations for this jam today and will finish it tomorrow.

BEFORE YOU START, NOTE:

  • that this is a two day recipe. You make preparations on day one and then you cook the jam day two since the rhubarb and the sugar must rest in the refrigerator overnight.
  • NEVER use aluminum saucepans when making anything with rhubarb since the aluminum will ruin the taste of the rhubarb and make it inedible. Always use enamel or stainless steel when preparing or cooking anything with rhubarb.

Now for the recipe. You’ll need:

  • 2 lb 3 oz (1 kg) stalks of rhubarb 
  • A little less than 5 cups (12 dl) sugar
  • 2 lemons – preferably organic 
  • 3 tablespoons of finely chopped preserved ginger in syrup (syltad ingefära)

DAY 1:

Rinse but don’t peel the stalks of rhubarb and cut them into small pieces. Chop finely the preserved ginger in syrup. Rinse the lemons in warm water. Cut each lemon into four wedges and cut the cloves into thin slices. Layer rhubarb, lemon, ginger and sugar in a bowl or large saucepan finishing with a layer of sugar. Cover it and keep it refrigerated overnight.

DAY 2:

Cook the rhubarb slowly and gently under a lid until the rhubarb is soft and mushy. Take the lid off and cook the jam slowly for approx. 45 minutes. Make the marmalade test: put a tablespoon of the jam in a glass of cold water. If you can make a soft marble of the jam then it is done. Scoop up the jam into clean, dry glass jars and let it cool off before putting the lid on the jars.

Now you have a wonderful jam to enjoy on toasted bread or scones!